Sunday, July 1, 2012

Baking for the Bug Man book

My book club is coming over tomorrow night to discuss Tim Downs' book, FIRST THE DEAD, a book featuring "the bug man," or a forensic entomologist.  If you're not familiar with the term, it's a man who specializes in determining how long people have been dead by the bugs found, er, on and in the body.

Enough of that.  Anyway, I always try to bake something that ties in with the book either directly or indirectly.  And, because I spent part of the afternoon at the SPCA, I didn't have a lot of time to come up with something.

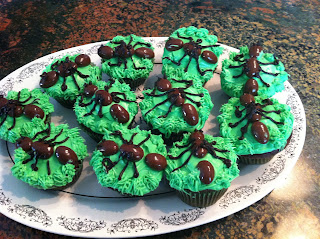
So I looked in one of my cupcake books (HELLO, CUPCAKE) and found a picture of some ants,  And since to my way of thinking ants = bugs, that's what I decided to do.  Easy and cute.

Frost the cupcakes with green frosting
What I needed:
cake mix
chocolate covered almonds
vanilla frosting
food coloring
dark chocolate frosting
baking tools (piping bags and tips)

First thing:  bake some cupcakes in green cupcake liners.  Because time was of the essence, I used a mix.

Second, mix some green and yellow food coloring into canned vanilla frosting.  I also bought a can of dark chocolate frosting for decoration.

closeup of the "grass" tip
When the cupcakes had cooled, I frosted them with the green color, then used the "grass tip" to put a little "grass" around the edges.  The frosting wasn't stiff enough to really hold the points, but from a distance it looks okay.

Then I simply placed three chocolate-covered almonds on each cupcake, then I used the dark chocolate to pipe legs and eyes on each ant.  The entire effect, I think, is cute, and it wasn't difficult at all.

You could, of course, line them up on your table if you wanted to cover it in a red and white checked table cloth, but our book didn't deal with a picnic theme . . . and rather than follow our book's theme exactly, I think I'll simply present the ants on a platter.

Enjoy your baking!


Three almonds on each

Pipe a little grass around the edges 

Pipe on the legs with chocolate frosting. Don't forget the little eyes. Done! 
~~Angie


Tuesday, March 6, 2012

The Trifle... for A CHANGE IN ALTITUDE

Last night was book club night, and I spent several days thinking about what kind of dessert would echo the theme of the book.  Since the book was about the decline of a marriage after a mountain-climbing incident, the task wasn't easy.

BUT--at one point in the story, a character mentioned that another character always served trifles.  Ta da! Easy.

Now--I don't know about you, but a trifle has always seemed insultingly easy.  Don't you just throw some store-bought sponge cake, vanilla pudding, and strawberries into a bowl?

So I decided to use my new cookbook--BAKING AND PASTRY, the textbook from the Culinary Institute of America, and I found that making a trifle wasn't so simple.  But oh, it was delicious.

(BTW, if you have to feed an army or a large group, this is the cookbook for you!)

Step one: red currant jelly into bowl

First, I had to make the spongecake, so I made that on Saturday night.  Actually, I made FOUR huge spongecakes, because these recipes don't come in small batches.  :-)   But I didn't mind, because I knew I could freeze the cakes for later.

Sunday night I had to make the pastry cream, and since that recipe would only keep for three days, I did make a a small, one-pound batch.

2: Bake a lovely sponge cake. (or buy one.) 
And finally, last night I had to assemble the trifle.  I began by coating the bottom of the trifle bowl with currant jam.  Yum.  Then I blended sherry with simple syrup, reserved that in a bowl.  Cubed the spongecake, then poured the sherry/syrup mixture over the cake to moisten the lot.

Then I had to whip 16 oz. of heavy cream; easy enough, and into that I blended the pound of pastry cream from the fridge.

Finally, I cut up some lovely strawberries and mixed with a package of fresh raspberries.  Then into the bowl they went--jam, cake, fruit, cream, more cake, more fruit, more cream.  Finally, I piped rosettes around the top, and made a mini-mountain in the center, to honor our book. :-)

And then--ooo la la.  It was delicious, if I do say so myself.  I have a feeling I'm going to like this new cookbook.  :-)

Cut said cake into cubes, then cover with syrup mixture. 
Hope your baking adventures are delightful!


Cover with fresh fruit of your choosing. 

Cover with cream, then repeat. Smooth top, pipe on decorations. 
~~Angie 

Saturday, March 3, 2012

Baking and Pastry--the textbook

Somehow I stumbled across a literal textbook last week called Baking and Pastry: Mastering the Art and Craft.    Yes, I know it's expensive, but they had a used copy available that was reasonable, so I ordered it.

And all I can say is--wow.  This HUGE  book is a text for the Culinary Institute of America, and it's very thorough not only in baking techniques and equipment, but also in recipes (or "formulas.")  And you know all those elegant plated deserts you can find in upscale recipes?  Yep, they're in here.  You can now make them yourself, if you've a mind to impress someone.  :- )

Tonight I made their formula for madeleines, a small batch that came out very well.  But I decided to bake a trifle for my book club Monday night (because a lady in the book made trifles), so I used their recipe, which begins with sponge cake.

Well, the problem with using a restaurant type cookbook is that you have restaurant type sizes.  The recipe made FOUR sponge cakes (I didn't mind, since I knew I could freeze them) but called for something like 755 grams of eggs and then 9 ounces of egg yolks.  I cracked over two dozen eggs and STILL didn't have enough, so I hope the cakes taste okay.

I have to say that they came out looking beautiful--tall, elegant, and golden in their eight inch pans.  So step one of my trifle was a breeze, and I can't wait to begin the rest, in which I'll have to make pastry cream, whipped cream, and some simple syrup (but I think I might have some already made in my pantry . . . will have to check.)

I've been hard at work on my next book and often work into the night, but on those days when I finish early, I love going into the kitchen and baking something.  Even if it ends up with the neighbors or in the freezer.  (I've had to get strict about calorie counting again. Oh, well. Such is life.)

I hope you are doing well.  What have you been baking lately?

~~Angie 

Tuesday, February 14, 2012

Lessons in Royal Icing . . . by Crystal Thieringer, guest blogger


Lessons in Royal Icing


I'm not sure when I decided that I needed to learn how to decorate cookies.  It may have been when I made gingerbread moose for my husband at Christmas and thought they should have eyes.  Perhaps it was when I made the sugar cookie snowflakes that my mother-in-law enjoys.  It may even have been because my friend Kay introduced me to www.foodgawkers.com because she thought I had nothing else to do with my time.  Based on the number of hours I have spent gawking there, perhaps I didn't! 

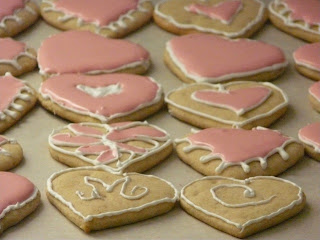
In any case, I bought a simple heart cookie cutter and yesterday I made Sour Cream Sugar Cookies using a recipe I have in a Better Homes and Gardens magazine from 2004. The only change I made to the recipe was to substitute Greek-style yogurt for the sour cream.    When it came to the Royal Icing, I followed a tutorial that I found while blog surfing; I used it because it had a lot of how-to pictures and some good advice. 

The cookies turned out great!  The decorating was a bit more of a challenge even though the icing was a lovely texture. 

Here are the things that I learned: 

  • Royal Icing is used for cookie decorating because it (eventually) dries into a nice hard shell.  Another name for Royal Icing is Cement That Won't Come Off Your KitchenAid. 
  • The process is simple.  Pipe the border with a fairly stiff icing. Thin the icing and use it to "flood" the cookie.  The border will stop the icing from overflowing, and the thin icing will go into all the nice scalloped edges you decided to pipe.  Of course, this is all a myth.  Flood icing can take a lot of coaxing to go into the corners.  Adding more icing will render the border completely useless, but will adhere the cookie to the countertop with no problem. 
  • There is barely enough red paste food colouring in a container to make a true 'red' icing.   This is why pink is a Valentine's Day colour. 
  • Getting Royal Icing out of your hair isn't as easy as you might think. 
  • Taking pictures of your cookies is a great idea, especially if someone that you truly love invites you to add them to her blog.  Of course, you might wish to wait until they are dry first.  The zoom mechanism on your camera will cease to work if you get Royal Icing on it.  Don't ask me how I know. 

Here is the thing that matters: 
  • My husband, who will be surprised by the cookies, will love them in spite of their failings.   Well, he might not be crazy about pink, but the rest will delight him. He loves me in exactly the same way.  All is right with the world.  
Crystal


Note from Angie:  Thank you, Crystal, for this wonderful adventure . . . and lesson.   The Lovin' Oven would love to hear from more of you!  

Monday, February 6, 2012

The Croquembouche

Begin with filled cream puffs (make puffs the day before; fill the hour before assembling croquembouche.)
Melt and boil sugar until it turns the color of caramel, remove from heat. Using tongs, dip cream puffs into caramel, then position inside oiled angel food cake pan or any pan with a sloped side. When you've filled the pan, invert onto a serving plate. 
With the foundation firmly in place, continue building cream puff layers, sliding them toward the center to make a cone shape. 
Built as tall as you like. Now decorate--I chose to drape my cone with spun sugar, but you could dust with powdered sugar or drizzle with chocolate. 
Close-up of my spun sugar. Next time, I'll formulate a plan. I like things a little neater. 
Ready for eating.  How to serve? Hand your guests  a cake knife and just let them go at it. :-) 
The croquembouche . . . being devoured.  Yes, it is hollow in the middle.  


Croquembouche (pronounced croak-em-boosh.  I think.)  


Well, it's done. I put the croquembouche together and served it to my book club. To rave reviews.

You always learn things when you attempt something, of course. Next time I'll not have any squat cream puffs (though not many of those went into the croquembouche--I made about three times too many, so ended up delivering them to my neighbor across the street. God bless them for eating all my experiments!)

Why did some of them come out squat?  Because one batch of my pate e choux (pronounced pat-a-shoo) had too many eggs in it. Plus, I didn't let it cool enough before adding the eggs. Like I said, we live and learn.

I filled the cream puffs with a chocolate filling and a kirsch-flavored vanilla pastry cream.  I used that long Wilton nozzle and a pastry bag.

I took a cue from Julia Child and started my croquembouche in an angel food cake pan, well oiled with a tasteless salad oil. Once I had built the base structure to the top of the pan, I simply turned it onto the serving plate and kept building from there. I did run out of sugar and have to melt a new batch (caramel--boiled sugar--serves as the "glue" to hold the puffs together, so you need quite a bit of it. But you can use any left over as spun sugar decoration.)

I went a little crazy covering the finished croquembouche with spun sugar. Next time I'll make a plan for all that sparkly golden goodness.

But it was fun, simple, and not too difficult.

So here are my pictures--and it served over a dozen, with plenty for the ladies to take home, too.

Very easy to make, especially if you spread the work over a few days.  Make the puffs one day and freeze. Make the filling another day and refrigerate.  Finally, a couple of hours before serving, fill the puffs and assemble the croquembouche.  You're done!

~~Angie

what I am making for book club tonight!


My book club read THE WEDNESDAY WARS this month, and the book features cream puffs in a starring role. So what better to make than this delectable confection?

I'll report back later . . . I've already baked the puffs and prepared two fillings, but have yet to put it together or to spin the sugar. We'll see how that goes today!

~~Angie

Friday, February 3, 2012

Baking with Children

The other day I bought a young baker's set . . . and even though my granddaughter is only nine months old, I'm already dreaming of the time when I can tie an apron around her, stand her on a stool, and watch her mix batter and lick the spoon.

Do you bake with your kids?  Have they discovered the joy of turning out some lovely, delicious, preservative-free something?

King Arthur Flour is featuring a blog about baking with kids, so I thought I'd pass it on.  Enjoy!

Note:  my book club read THE WEDNESDAY WARS, a story that features . . . cream puffs.  So I've been baking them every night, because on book club night I intend to build a croque em bouche.  :-)  Photos to come!

~~Angie